1. Introduction😀
Moodle
(Modular Object-Oriented Dynamic Learning Environment) is a free and
open-source Learning Management System (LMS) used by schools, colleges,
universities, and organizations to create and manage online learning
platforms. It enables teachers to upload study materials, create
quizzes, assignments, discussion forums, and monitor student progress
through an easy-to-use web interface.
Moodle
is highly customizable through themes and plugins, making it suitable
for educational institutions as well as corporate training environments.
Moodle using the PHP programming language. It uses HTML, CSS, and JavaScript for the user interface and stores data in relational databases such as MySQL, MariaDB, PostgreSQL, or Percona. Moodle runs on web servers like Apache or Nginx, making it a flexible and scalable platform for online education.
| Technology | Purpose |
|---|---|
| PHP | Core server-side programming language used to develop Moodle. |
| MySQL / MariaDB / PostgreSQL / Percona | Database management system for storing users, courses, grades, etc. |
| HTML5 | Structures the web pages displayed to users. |
| CSS3 | Styles and designs the Moodle interface. |
| JavaScript (ES6) | Adds interactivity, dynamic content, and client-side functionality. |
| Apache or Nginx | Web server that hosts the Moodle application. |
2. What is Docker?
Docker
is an open-source containerization platform that allows applications
and their dependencies to be packaged into lightweight containers. These
containers can run consistently on any operating system without
requiring manual software installation.
Instead
of installing Apache, PHP, MySQL, and Moodle separately, Docker bundles
all required components into isolated containers.
3. Why Use Docker for Moodle?
Deploying Moodle manually requires installing and configuring multiple software packages such as:
- Apache Web Server
- PHP
- MySQL/MariaDB
- Moodle Source Code
- PHP Extensions
- Database Configuration
This process can be time-consuming and may lead to compatibility issues.
Docker simplifies deployment by packaging each service into separate containers that work together automatically.
Advantages of Docker
- Fast deployment
- Easy configuration
- Consistent environment across systems
- Isolation between services
- Easy maintenance
- Portability
- Scalability
- Simplified upgrades
4. Why Docker Compose?
Docker Compose allows multiple Docker containers to be managed using a single configuration file.
For Moodle deployment, different services such as:
- Moodle Application
- Apache Web Server
- PHP
- MySQL/Percona Database
can be started together with one command.
This eliminates the need to manually start each container individually.
5. Project Structure
The
project contains all required configuration files for automatic
deployment.you need to contain all these files in one seperate foler and
files name should be case sensitive There is a project files:
docker-compose.yml
The docker-compose.yml
file is the main configuration file used by Docker Compose to define
and manage multiple containers as a single application. It specifies the
services, networks, volumes, environment variables, and port mappings
required for the Moodle deployment. Using this file, all containers can
be started, stopped, and managed with a single command (docker compose up), making deployment simple and consistent.
#version: '3.8'

services:
  # ===== DATABASE (MySQL) =====
  mysql:
    build:
      context: .
      dockerfile: Dockerfile.percona
    container_name: moodle_mysql
    environment:
      MYSQL_ROOT_PASSWORD: root123
      MYSQL_DATABASE: moodle
      MYSQL_USER: moodle
      MYSQL_PASSWORD: moodle123
    ports:
      - "3306:3306"
    volumes:
      - mysql_data:/var/lib/mysql     #use your local storage to save database if you delete the container then all data will be save
      - ./mysql-config.cnf:/etc/mysql/conf.d/moodle.cnf:ro
    networks:
      - moodle_network    #connect all container in one network for communnication
    healthcheck:
      # Authenticate over the local socket; an unauthenticated TCP ping can
      # repeatedly negotiate the deprecated sha256_password plugin.
      test: ["CMD-SHELL", "mysqladmin ping --protocol=socket -uroot -p\"$$MYSQL_ROOT_PASSWORD\" --silent"]
      timeout: 5s
      retries: 10
      interval: 5s
    restart: unless-stopped

  # ===== PHP-FPM =====
  php-fpm:
    build:
      context: .
      dockerfile: Dockerfile.php
    container_name: moodle_php
    depends_on:
      mysql:
        condition: service_healthy
      moodle:
        condition: service_completed_successfully
    volumes:
      - moodle_html:/var/www/html
      - moodle_data:/var/www/moodledata
    networks:
      - moodle_network
    environment:
      DB_HOST: mysql
      DB_NAME: moodle
      DB_USER: moodle
      DB_PASS: moodle123
    restart: unless-stopped

  # ===== MOODLE APPLICATION (Installer) =====
  moodle:
    build:
      context: .
      dockerfile: Dockerfile.moodle
    container_name: moodle_app
    volumes:
      - moodle_html:/var/www/html
      - moodle_data:/var/www/moodledata
    networks:
      - moodle_network
    restart: "no"

  # ===== APACHE WEB SERVER =====
  apache:
    build:
      context: .
      dockerfile: Dockerfile.apache
    container_name: moodle_apache
    depends_on:
      php-fpm:
        condition: service_started
      mysql:
        condition: service_healthy
    ports:
      - "80:80"
      - "443:443"
    volumes:
      - moodle_html:/var/www/html:ro
      - moodle_data:/var/www/moodledata:ro
      - ./apache-config.conf:/usr/local/apache2/conf/extra/moodle.conf:ro
    networks:
      - moodle_network
    restart: unless-stopped

# ===== VOLUMES (Data storage - persistent) =====
volumes:
  mysql_data:
    driver: local
  moodle_html:
    driver: local
  moodle_data:
    driver: local

# ===== NETWORK (Container communication) =====
networks:
  moodle_network:
    driver: bridge  #use bridge network for container communication
Dockerfile.apache
The Dockerfile.apache
is used to build a custom Docker image for the Apache HTTP Server. It
installs and configures Apache with the required modules and settings
needed to serve the Moodle application. This ensures that the web server
is configured consistently every time the container is created.
Note: In Docker we use apache2 but name will write httpd
FROM httpd:2.4

# Install necessary tools
RUN apt-get update && apt-get install -y wget curl && apt-get clean

# Enable Apache modules needed for PHP
RUN sed -i '/^#LoadModule proxy_module/s/^#//' /usr/local/apache2/conf/httpd.conf && \
    sed -i '/^#LoadModule proxy_fcgi_module/s/^#//' /usr/local/apache2/conf/httpd.conf && \
    sed -i '/^#LoadModule rewrite_module/s/^#//' /usr/local/apache2/conf/httpd.conf && \
    sed -i '/^#LoadModule headers_module/s/^#//' /usr/local/apache2/conf/httpd.conf

# Ye line add kiya:
RUN mkdir -p /var/log/apache2

# Copy Apache configuration
COPY apache-config.conf /usr/local/apache2/conf/extra/moodle.conf

# Add configuration to main httpd.conf
RUN echo "Include /usr/local/apache2/conf/extra/moodle.conf" >> /usr/local/apache2/conf/httpd.conf

EXPOSE 80
CMD ["httpd-foreground"]
Dockerfile.php
The Dockerfile.php
builds a Docker image containing the PHP runtime required by Moodle. It
installs PHP along with all the necessary extensions such as MySQL
support, XML, GD, ZIP, and other libraries required by Moodle. This file
guarantees that the PHP environment is properly configured and
compatible with the Moodle application.
FROM php:8.3-fpm

# Install PHP extensions needed for Moodle
RUN apt-get update && apt-get install -y \
    libpng-dev \
    libjpeg-dev \
    libfreetype6-dev \
    libzip-dev \
    libxml2-dev \
    libcurl4-openssl-dev \
    libonig-dev \
    && docker-php-ext-install \
    gd \
    pdo \
    pdo_mysql \
    zip \
    xml \
    curl \
    mbstring \
    ctype \
    iconv \
    opcache \
    && apt-get clean

# Moodle's installer uses the MySQLi driver rather than PDO.
RUN docker-php-ext-install mysqli

# Moodle requirements: intl is mandatory; SOAP and EXIF are recommended.
RUN apt-get update && apt-get install -y --no-install-recommends libicu-dev && \
    docker-php-ext-install intl soap exif && \
    apt-get clean && rm -rf /var/lib/apt/lists/*

# PHP settings for Moodle
RUN echo "memory_limit = 512M" >> /usr/local/etc/php/conf.d/moodle.ini && \
    echo "upload_max_filesize = 100M" >> /usr/local/etc/php/conf.d/moodle.ini && \
    echo "post_max_size = 100M" >> /usr/local/etc/php/conf.d/moodle.ini && \
    echo "max_execution_time = 300" >> /usr/local/etc/php/conf.d/moodle.ini && \
    echo "max_input_vars = 5000" >> /usr/local/etc/php/conf.d/moodle.ini

WORKDIR /var/www/html
EXPOSE 9000
CMD ["php-fpm"]
Dockerfile.moodle
The Dockerfile.moodle
is responsible for preparing the Moodle application inside a Docker
container. It copies the Moodle source code, sets the required file
permissions, and performs any necessary application-specific
configuration. This ensures that Moodle is ready to run immediately
after the containers are started.
FROM alpine:latest

# Install git to clone Moodle
RUN apk add --no-cache git curl bash

WORKDIR /usr/src/moodle

# Clone Moodle 4.5 stable version and you can change the version just replace 405 to your version
RUN git clone --depth 1 --branch MOODLE_405_STABLE https://github.com/moodle/moodle.git .

COPY docker-entrypoint.sh /usr/local/bin/moodle-bootstrap
RUN chmod +x /usr/local/bin/moodle-bootstrap

# Populate the named volumes on their first use, then exit successfully.
ENTRYPOINT ["/usr/local/bin/moodle-bootstrap"]
Dockerfile.percona
The Dockerfile.percona
creates a Docker image for the Percona database server, which is a
high-performance MySQL-compatible database. It initializes the database
environment and applies any custom configurations required for Moodle.
This container stores all application data, including users, courses,
grades, and learning content.
FROM percona:8.0
# You can change the version of percona mysql

# Set environment variables for database setup
ENV MYSQL_ROOT_PASSWORD=root123 \
    MYSQL_DATABASE=moodle \
    MYSQL_USER=moodle \
    MYSQL_PASSWORD=moodle123

# Copy MySQL configuration file
COPY mysql-config.cnf /etc/mysql/conf.d/moodle.cnf

EXPOSE 3306
CMD ["mysqld"]
docker-entrypoint.sh
The docker-entrypoint.sh
script is executed automatically whenever a container starts. It
performs initialization tasks such as checking required files, setting
permissions, initializing services, and preparing the environment before
launching the main application. This script automates repetitive setup
tasks and ensures that the container starts correctly.
Note: Give +x Execution permission to this file
#!/bin/sh
set -eu

mkdir -p /var/www/html /var/www/moodledata

# A Docker volume mounted at /var/www/html starts empty and hides the source
# baked into the image. Copy Moodle into it only on the initial bootstrap.
if [ ! -f /var/www/html/index.php ]; then
    cp -a /usr/src/moodle/. /var/www/html/
fi

# www-data in the PHP image uses UID/GID 33.
chown -R 33:33 /var/www/html /var/www/moodledata
chmod 770 /var/www/moodledata
apache-config.conf
The apache-config.conf
file contains the Apache web server configuration for the Moodle
application. It defines settings such as the document root, virtual
hosts, directory permissions, and URL handling. Proper configuration
ensures that Moodle is accessible through a web browser and that
requests are processed securely and efficiently.
<VirtualHost *:80>
    ServerName localhost

    DocumentRoot /var/www/html
    DirectoryIndex index.php index.html

    # Connect Apache to PHP-FPM container
    # When .php file is requested, send to php-fpm:9000
    <FilesMatch \.php$>
        SetHandler "proxy:fcgi://php-fpm:9000"
    </FilesMatch>

    # Allow access to Moodle directory
    <Directory /var/www/html>
        Options -Indexes +FollowSymLinks
        AllowOverride All
        Require all granted
    </Directory>

    # Logs
    ErrorLog /proc/self/fd/2
    CustomLog /proc/self/fd/1 combined
</VirtualHost>
mysql-config.cnf
The mysql-config.cnf
file contains custom configuration settings for the MySQL/Percona
database server. It allows tuning of database parameters such as memory
allocation, connection limits, character encoding, and performance
optimization. These settings help improve the stability and efficiency
of the Moodle database during operation.
[mysqld]
# Character set for Moodle (important!)
character-set-server = utf8mb4
collation-server = utf8mb4_unicode_ci
default-character-set = utf8mb4

# Performance settings
max_connections = 1000
max_allowed_packet = 512M
thread_stack = 192K

# InnoDB settings (recommended for Moodle)
default_storage_engine = InnoDB
innodb_buffer_pool_size = 1G
innodb_log_file_size = 512M
innodb_file_per_table = 1

# Logging
log_error = /var/log/mysql/error.log

[client]
default-character-set = utf8mb4

[mysql]
default-character-set = utf8mb4
6. Installation Procedure
Store all these files in a single seperate directory within the directory run follow these process
Step 1
docker compose upThis will take 5-10 minute for complete setup, Now type localhost on your browser 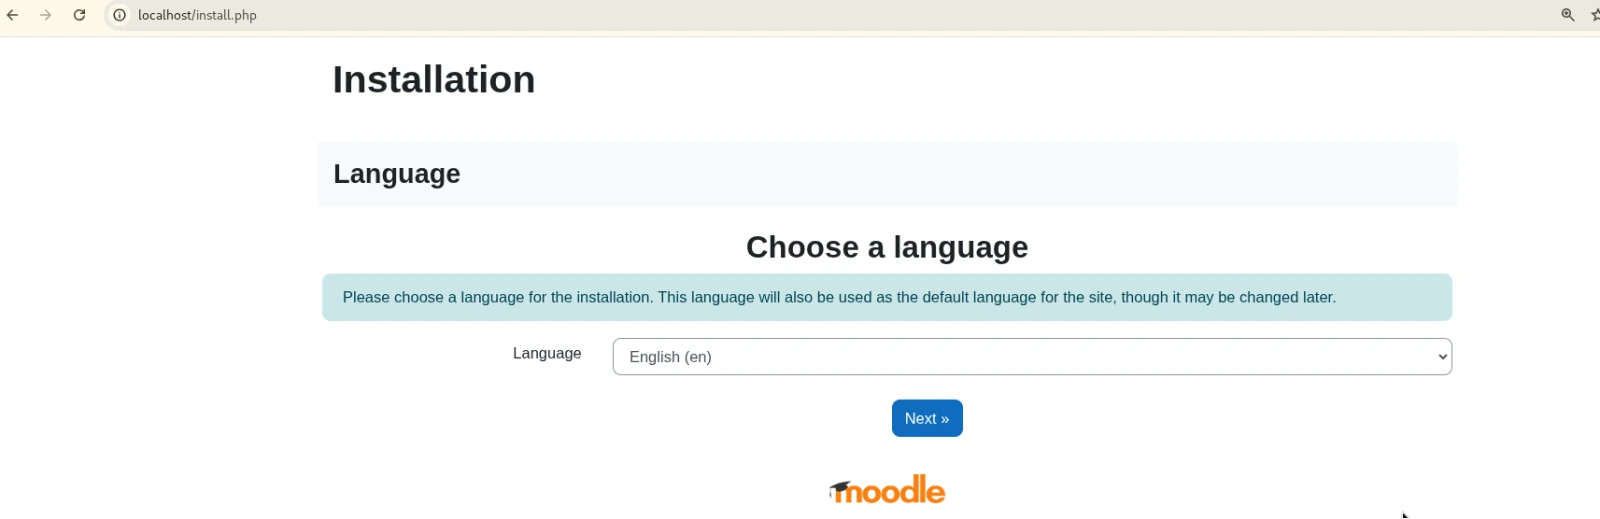
Next -> Next -> 
we have use percona mysql so click on next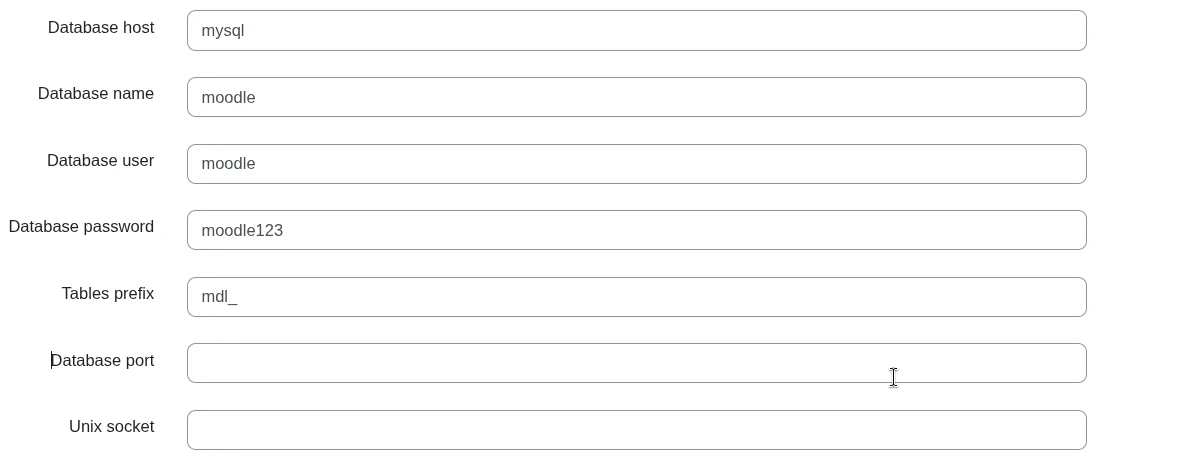
Review all configurations in the Dockerfile.percona. Click Continue to install Moodle, and the rest of the setup—including creating your admin account—will be straightforward.
7. Important notes
Check your containers
docker ps All containers has been created
If you want to login and See your moodle database tables then You have two ways First is copy the mysql container id then
docker exec -it 267ad01b1cba bash
[mysql@267ad01b1cba /]$ mysql -u moodle -pmoodle123
mysql> use moodle;
mysql> show table;
Second is copy the mysql container id, and copy the container IP address and login normal way.
docker inspect 267ad01b1cba
#copy the container ip address
mysql -h 172.23.0.2 -u moodle -pmoodle123 --skip-ssl
Now select your database and see all tables.
Deploying Moodle using Docker provides a simple, reliable, and reproducible solution for hosting an online learning platform. By using pre-configured Dockerfiles and Docker Compose, the complete Moodle environment—including the web server, PHP runtime, and database—is automatically configured and launched with a single command
This approach reduces installation complexity, minimizes configuration errors, and ensures a consistent deployment across different systems, making it an efficient solution for development, testing, and production environments.🤘👍👍👍
No comments yet. Be the first to comment!